Landing Page Design: Step-by-step Guide
Using HubSpot CRM's free powerful drag-and-drop Landing Page Editor.
In this guide, you will learn how to create, style, and publish a landing page from start to finish. We will also share ways to quickly create a landing page, using the mockup approach with landing page design examples and tools that can save you time.
Free Download: Landing Page Copywriting Formulas Template
1. Landing Page Basics
What is a Landing Page?
You can think of landing pages as digital sales representatives who are gathering information about your potential customers, working for you 24 hours a day, 7 days a week. Landing pages are designed to frame a content offer in a much more targeted way than your homepage on your main website.
The goal of a landing page is to engage the audience and convert them into qualified leads.
How Does a Landing Page Work?
The typical landing page conversion path is as follows:
- A visitor sees a Call-To-Action button (CTA) informing them of an interesting offer.
- They click on the CTA which then directs them to the landing page without excess navigation so as not to distract them from completing the desired action.
- The visitor is then asked to complete the form with the necessary information.
- After submitting the form, a user is then redirected to a “Thank-You" page where they can download the offer or receive an email following up with the offer.
The “Thank-You" page which has a navigation menu, will then act as an entryway back to the main website. All landing pages use a form to gather information. Without a form, you won't be able to convert a website visitor into a lead on a landing page. By using the information you gather from the form, you will be able to build and nurture relationships with your leads.
What Makes a Good Landing Page?
Your checklist is here
- A good landing page should have a headline, a copy, an image, and a form.
- A headline in the Above-The-Fold section is the first thing visitors will see when they “land” on a landing page.
- A great headline sums up the offer as clearly and concisely as possible and answers the question, "What will visitors who convert on this page receive?"
- Copy is the text on a landing page that should explain the value of the offer clearly, simply, and in a compelling way.
- Numbers, bullets, and checkmarks can help break up long bodies of text.
- Images and visuals are also an important factor in a landing page, as they supplement your message to the visitors.
- The form is also an important element on the page where visitors can submit their information in exchange for the offer, converting them into leads.
Why is a Landing Page Important?
Landing pages are important for businesses because they help them qualify leads that are already interested in their line of products and services. These people only need a little push through the copy to be enticed to take immediate action.
Through the information collected through the form on the landing page, you can build connections and nurture relationships with your leads. It allows you to provide a personalised offer to interested prospects. Plus, It enables you to build an email list of potential customers that you can further nurture at a later time, and it definitely helps you generate sales conversions.
2. Software Tools For Landing Page Design
To get started with the landing page creation, it is essential to first prepare the tools you need. We recommend you download the following tools.
These software tools work best with Google Chrome. If you don't already have Google Chrome, you can download it here.
Free Powerful Drag-and-Drop Landing Page Editor
Hubspot is a marketing platform that has various features and services, including landing page creation. Its drag-and-drop Landing Page Editor makes marketing efforts simple. HubSpot is free, has is a full customer relationship management system, and has an outstanding email integration, plus landing pages, live chat, forms and email marketing. It even links to Google Ads, Facebook and LinkedIn to make it easier for you to run your own advertising in a simple and easy manner.
To start creating your landing page, sign up to Hubspot CRM Free.
Relate article: 5 Best CRM Software Tools for Small Businesses
Find Any Font On a Website
WhatFont lets you know what font is used on any website, allowing you to know the font's name, family, colour, style, size, and position.
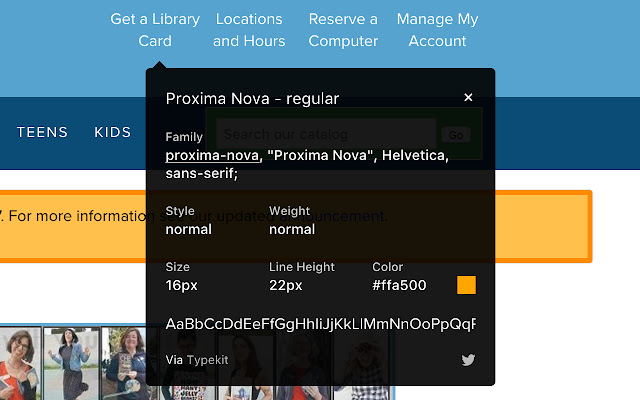
Instructions:
- Go to the “WhatFont" in the Google web store
- Click the “Add to Chrome” button.
- Click the “Add Extension” from the pop-up. It will then automatically install the extension to Chrome.
- To pin WhatFont on top of the browser, hit the “Extension” icon, then choose “WhatFont” from the options by clicking the pin icon.
Find Any Colour On a Website
With ColorZilla you can get a colour reading from any point in your browser quickly adjust this colour and paste it into another program. And it can do so much more...
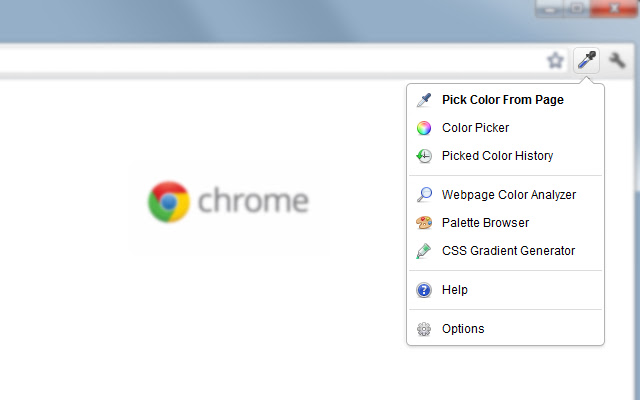
Instructions:
- Go to “ColorZilla" in the Google web store
- Click the “Add to Chrome” button.
- Click the “Add extension” from the pop-up. It will then automatically install the extension to Chrome.
- To pin ColorZilla on top of the browser, hit the “Extension” icon, then, choose “ColorZilla” from the options by clicking the pin icon.
3. Create Thank-You Page
Step 1: Create New Thank-You Page
Here’s how you can quickly create the Thank-You page using the HubSpot Landing Page Editor.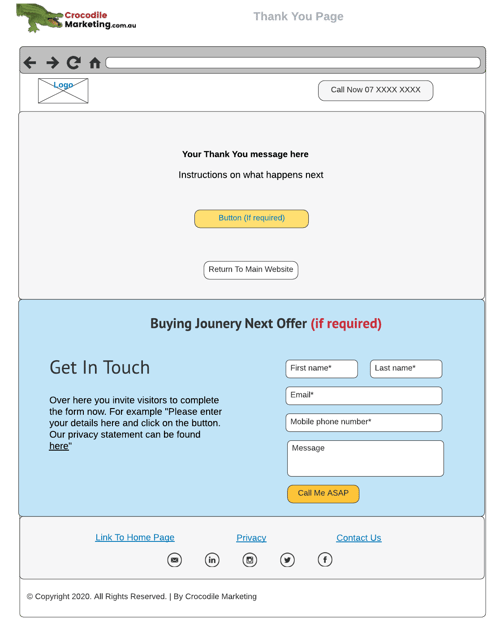
- Login to Hubspot.
- Navigate to Marketing in the main menu.
- Select Landing Pages.
This will take you to the landing page dashboard, where you can view all your draft and published pages, create new pages, and edit existing ones.
- Click Create on the upper-right corner to create a new page. You will then see a few templates that you can choose from.
- Select the template called "Bold - Feature" and give your page a name.
This name is for internal use only, so make it descriptive. This way, you and your team can tell which page it is at a glance.
- After choosing a name, hit the “Create Page” button below.
- Next, you’ll be brought to the drag-and-drop page editor that you can use to create your mockup.
- On the left sidebar, you will see widgets that you can drag and drop anywhere on the interactive page editor on the right hand side.
Step 2: Change The Logo
- Once inside the page editor, go to the Header section and clone the first section.
- Delete the unwanted modules in the header section and edit the logo. To change the logo, just click on the existing logo.
- Once uploaded, click on the image, and hit replace. Then, click the image on the right-hand side that you want to put on your landing page. Finally, click Insert.
- To change the style of the Logo section, click the Arrow and choose Style. You can then change the background or the spacing.
Step 3: Add a Telephone Number
- To add a telephone number in the header, just drag a textbox and drop it to the right-hand side beside the logo, creating another column.
- Delete the unnecessary texts and type in your phone number. Click Edit in the expanded view to edit its size and reposition its location.
- To convert the number into a clickable phone number, click Insert Link and enter the command “tel:” followed by your phone number on the URL box. Then, click Insert.
- Your phone number will then be a clickable link on a mobile phone.
- Click the “Apply Changes” button to save the changes made.
In this part, we won’t worry yet regarding the images and it texts we will include. We will focus first on the structure so we have a clear idea of what type of information to include.
This could be time-consuming if you don’t really have an idea of what to put on, and might even disrupt your planning stage, but by creating the mockup first you will get a clearer view of your landing page, what it is and how it is like.
Step 4: Update Colour and Font
- Now, to change a colour, you just have to select the widget to which you want to change the background colour, then click Style, then Style Section.
- Go to Background, then choose Background Colour Type and choose your preferred colour. You can use the ColorZilla tool to have the same colour as your website.
- If you want to change the background, you just have to click on any section then do the same with what you did earlier for the colour.
- To edit the overall design of your page, click the Design tab at the top of the screen.
- Here, you can make universal changes to different design elements on your page, such as fonts and button styles.
Step 5: Create the Footer
- Going down to the footer, you can customize your social media pages.
- You can drop a textbox right below the social media icons and you can modify the social media icons.
- To edit the textbox on the footer, you just have to click it, then hit Click the Expanded View.
- In the footer, you can put your company name, contact info, and privacy policy links. You can insert the link and also change the size and font.
Step 6: Publish Your Thank-You Page
- Delete any sections you do not need as per the design template above.
- To publish a thank-you page, go to Settings. Enter a page title and a content slug.
- Click Publish - your webpage is now live.
You have completed your Thank-You page design.
You can come back to add the text late. Now let's move on to creating the landing page design and linking your landing page to the thank-you page.
4. Download Landing Page Design Layout Example
In order to be successful in creating a landing page, the first thing that we really recommend is to use a landing page design example layout. The mockup layout will help you understand how the landing page will look like. Once you understand the mockup, you will then be able to know how much text and images you will need in order to write for your landing page.
Landing Page Example With Phone Number
This layout provides a starting point for you to create your landing page, where you want a person to call you or complete a form.
You can download the pdf version here.
In this version, the phone number is clickable when the web visitor is using their mobile phone.

5. Create Landing Page Design
Step 1 - Create New Landing Page
- Make a copy of your Thank-You page by using the clone option, and rename it as a landing page.
By using the clone option will save you time, as you won't need to create the header and footer again.
Step 2 - Create the Headline
- Following the layout that we have, to create the headline we just have to clone the first section.
- Clone the right-hand side column and remove text.
- Add landing page hero image by selecting Section Style, clicking Background, and selecting image. Here, you can upload a hero image. Check out this article on how to find hero images for landing pages.
- Add the 2 buttons on the left-hand column below the texts for the headline.
- Add the text "Call Now" to the first button, and add your telephone number to the URL field including the HTML tag "Tel:<phone number>"
- Add the text "Request a Callback" to the second button and leave the URL for now, we will update this later below.
Step 3 - Create the Features and Benefits Section
- Now, create the Benefits section by cloning the previous section and deleting the unwanted modules.
- Now, place 1 image placeholder and 1 text placeholder.
- Now clone the column two times.
Step 4 - Create the Additional Information Section
Every landing page should not talk about your offer on their headline and on the Benefits section. Always choose to add another section to explain your offer further.
- Again, to create a new section you just have to clone a section and delete the unwanted objects.
- Add the text placeholder.
- Add the image placeholder to the right of the text placeholder so the text and image are together.
- Add a background colour by selecting Section Style, clicking Background, and selecting Colour. Here you can choose a light colour to help break up the webpage when the reader scrolls down the page.
Step 5 - Create the Testimonial Section
- The disadvantage of using the FREE Hubspot version is you don't have access to other widgets such as sliders.
- To create your testimonial, you can go ahead and use the image and text pair, with the image on the left-hand side.
- To add other sections, you really just have to clone a section, then edit or delete a module or object.
- You just have to drag-and-drop and place them where you want them to be.
- You can also opt to change the background color of each section to separate them from each other.
Step 6 - Create the Form
Now it's time to create a form that we can link later to the CTA button on the headline.
- To create a form, you can have text-and-form pairs. Just drag a form to the right-hand side following the layout that we have. Just close another section and delete other objects.
- Just make sure that you drag the form correctly so it will position where you intend to place it.
- You can use the form as is, or you can make a new form to have more fields.
- To create a new form, you just have to click it and it will open its editor.
- Change the form title, then hover down and click “Create New”.
- You will then be routed to the Form Editor for you to select the fields that you want.
- Add the Submit Button text to "Call Me ASAP".
- Redirect the form to your Thank-You page that you created above.
- Remember to send the "Send Form Notifications", so you get notified when someone completes the form.
- You can also change the style, placements, and colour by clicking the design tab.
- Now, to put a label on the text fields you just have to click the object then enter a label in the “Placeholder Text” portion for it to appear on the form when published.
- You can set the textboxes to “Required” to ensure that the visitors will enter the required fields.
- To change the label of the button, you just have to click it and change its caption.
- Once you have created a form for the first time, you don't have to create another form again. You just have to simply add the form to every landing page.
Step 7 - Link Form To Button
To drive the visitor to the form, you have to link the button to the section that contains the form. All you have to do is use the Anchor Tag function.
- Go down the Testimnonal Section and add a text placeholder at the bottom of this section. Note that the Anchor Tag needs to be above the section you want to display.
- Hit the “Edit the Expanded View” button. Look for “Insert” and click “Anchor”. Enter the name of the anchor tag using the "Form" that you will use to connect to the CTA button on the headline.
- You can use whatever name you like on the Textbox, but it must be the same name you will use on the button on the headline. Otherwise, the function will not work.
- After setting the name, head back to the CTA button and change the URL by adding “#” before the word “Form” on the images.
Step 8 - Publishing the Landing Page
- Remove any sections you no longer need.
- To publish a landing page, go to Settings. Enter a page title and a content slug.
- A content slug is just like a page title but words are separated with a dash between them.
- Once they are completed, you can then hit the “Publish” button in the upper-right corner of the page.
- Once you click Publish, it will give you a link that you can use to view your landing page.
- When you view your landing page, the URL shows the Hubspot Page Builder. That is because you are using the free version of the tool.
Also, if you scroll down on the footer area, you will also see a little bit of advertisement as part of the free version of Hubspot. The moment that you upgrade to one of the paid versions, it gives you access to lots of features and deletes the unwanted features available in the free version.
Step 9 - Test Landing Page and Thank-Your Page Together
- Open your new landing page in a new tab.
- Check the "Call Now" button is working.
- Check the telephone number in the top-right corner is working.
- Check the "Request a Callback" button is working by moving down to the form section.
- Complete the form and click the "Submit" button, to ensure it redirects to your "Thank-You" page.

You Have Completed Your Landing Page Design
The landing page design is part of your lead generation process. Use the tips we covered to get started and remember to refine and iterate as you go.
There’s no such thing as a lead generation campaign that doesn’t work — there are only ones that need a bit more work. Using the strategy and information provided above, you have what you need to create a successful lead gen campaign that drives leads and attracts more customers.